Been doing a bit of tinkering with Photoshop, taking some inspiration from the works of Lewitt-Him and Alice/Martin Provensen. I wanted to see whether I could produce a similar effect to their simplistic cutout style using digital techniques.
 |
| Click for larger view |
Not altogether too happy with it. I'm fairly pleased with the trees and grass and general scenery, but I really lost my groove on the house, which came out horrendously. There was a lot of detail that was difficult to break down and I was starting to get really impatient with some technical issues (read: Photoshop throwing up an "unrecoverable error" at me every 10 minutes), so I ended up really rushing it!
I thought that having quite bold and simplistic backdrops could work quite well if I was to have quite detailed character puppets, helping to bring focus to the scene. I think the colours could stand to be a little more subdued. Though I used a relatively limited pallette it's almost quite garish and potentially distracting. Lowering the opacity might help as opposed to completely re-colouring the entire scene.
The image was quite simple (if a little time consuming) to create — the original image (above) was sourced from
sxc.hu, a free stock image resource. Ordinarily, I would prefer to go out and source my own images to use, but for the purposes of a spontaneous experiment it didn't really seem worth a trip to Holland ;] Retrospectively I could have used almost any image but I thought I'd try and keep with the theme of the project!
First I applied a Poster Edges filter to the image. This was to darken existing contrast boundaries and help Photoshop detect the edges of each object in the image when it came to the selection process.
I then increased the brightness and contrast very slightly — again, to help with edge detection.
The cutout filter is one usually best avoided — in this instance, though, I found its use acceptable in order to help simplify the colours and shapes in the image, providing me a solid guideline to work from.
I then duplicated the background layer and applied a Find Edges filter to the copy. This gave a strong, distinct outline to everything in the image.
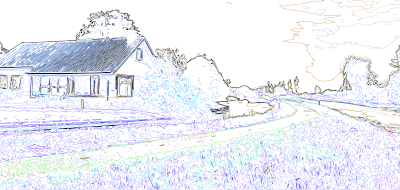
Unfortunately, in doing so, it also loses its colour information. Ideally I need the guidelines and the simplified colours/shapes from the previous layer, so I applied a Soft Light blend mode to remove the white from this layer and overlay it onto the one below.
The result is this fairly ugly but very useful image. It contains both the outlines from find edges and the simplified colours and shapes from the cutout filter, providing a perfect guide to paint over.
Because of the clear colour and edge distinction, I was able to simply use the magnetic lasso tool to make a loose selection around any area in the image. Photoshop was able to very accurately detect the edges of whatever I was selecting and mostly guided itself.
I could then just fill the selection with my chosen colour.


0 comments:
Post a Comment